Size 37-38
Yarn - "Derevenka" from Troitsk, natural color (1508), 100% wool, 170 m / 100 g,
Yarn consumption 100 g
Hook No. 3.5
The knitting density of the main mating (columns without crochet) Pg = 1.54 loops per cm, Pv = 1.8 rows per cm
Leg circumference (He) 23 cm
Here we will describe in detail how to tie simple slippers crocheted . It is enough that you know how to knit sticks without a crochet and knit in a circle (see "Crochet lessons" ). The proposed technique will allow you to tie slippers to any size of the foot, including children's slippers. These slippers are simple in form, but comfortable to wear.

You can make your thing unique by applying different types of finishes: knitted motifs (as in our case), embroidery, flowers, etc.
First we measure the girth of the leg.
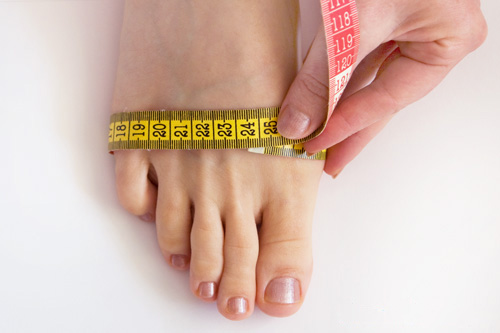
We begin to knit slippers from the toe . We make a sliding loop , we knit 6 columns without a crochet, including 1 air loop of lifting , then we knit a circle, obeying the main rule of knitting a circle: the number of columns added in each row should be equal to the number of columns in the first row, in our case 6. The work at the beginning of the new series is rotated. If you knit without turning the work, then the pattern on the toe and the rest of the slippers will be different in appearance. We knit until the circumference is equal to the leg circumference. We calculate the number of columns. It will be equal to the measure of leg girth, multiplied by the density of knitting horizontally: It x Pg = 23 x 1.54 = 35.42. Round off, we get 36 columns. That is, you need to knit in a circle with the increments until you get 36 loops (columns). Given the rule of the circle, to get 36 columns, you need to associate 6 rows. It is possible that your calculation in the last row will need to make fewer increases - there is nothing to worry about,

Next, we continue to knit without any increase. We knit the desired length of the toe, in this case just below the thumb bone, which is 7 cm or 14 rows.
We knit the middle part of the slipper with a straight cloth. The middle part will have 2/3 of the 36 columns, that is, 24 columns. We continue to knit the middle part. To make the slipper sit tight on the foot, make it shorter than the foot approximately 3 - 3.5 cm for an adult size and 2 - 2.5 cm for a baby (this is half the width of the heel). At this stage, it is possible to press the middle part of the slipper, since the web, connected with the columns without the crochet, has the property of being twisted. So the product in the finished form will look neater. However, this can not be done: the slipper will sit on his leg well without it.

Now we begin to form the heel. For this we divide the loops into three parts. The number of loops of the middle part is 1/3 of 24 loops - 8 loops are produced. If you have 1 loop in the rest - add it to the middle part, if 2 loops - one to the side parts. Form the heel will be shortened rows. We begin to tie the heel from the wrong side . We send 8 bars without the first part, then 7 bars without middle cake, we pass the 8th column of the middle part, and in the first loop of the third part we knit the connecting post. The heel is obtained more accurately if the last side is on the front side, tying the connecting post as usual, inserting the hook into the loop in front, and on the wrong side - inserting the hook into the loop from behind.

We turn the work on the front side.

The first column in the shortened row is knit without a loop of lifting in the first loop from the hook.

Again, we sew 7 loops of the middle part with columns without a crochet, and in the first loop of the side part we knit the connecting column, while the hook is inserted into the loop in front .

In the following rows we knit 7 loops of the central part and attach the loop of the side part with a connecting column. So we attach all the loops from the side parts. We finish knitting a heel with a facial series. As a result, you get such a neat little heel.

Now we tie the edge of the slipper (except for the heel) with columns without a crochet, slightly tightening the edge for a better fit of the slipper on the leg. Then we knit along the edge a row of connecting posts , already including the heel. Cut the thread and hide its end. The slipper is ready. The second knitting is exactly the same.

In our example for finishing a semicircular motif is used, crocheted , and the edge is additionally tied with two rows of connecting posts of blue yarn. The motives are attached to the slipper in the process of tying the edge.


0 yorum:
Yorum Gönder